Introduction
There are multiple ways of authenticating users on your instance of statscloud. You can either:
- Set passwords for your users
- Use an OAuth service
- Make use of your own Single Sign-On service
Or use a combination of all these together. More information on passwords, OAuth, and Single Sign-On follows below:
Passwords
Providing passwords for each of your users is the most basic way of authenticating them. When you Set up your instance of statscloud, you have the option to upload a spreadsheet of user credentials securely via an .csv file inside your admin dashboard. This spreadsheet includes a "password" column which you can use to define a password for each of your users. Please see the guide above for more information on this.
Changing passwords
Users are able to change their passwords on their profile page ( https://statscloud.your-domain.com/home/profile). However, if you have a central "change password" system, you can make use of our API in your code here to change their statscloud password as part of this. The API route to do this is below:
API Endpoint
POST https://statscloud.your-domain.com/api/user.set_password
Request
{
    "id": [uuid for your user],
    "password": [new password]
}
Response
null
A full cURL request to achieve this is below:
curl -X POST \
  -H "Authorization: Bearer <your admin token>" \
  -H "Content-Type: application/json" \
  -d '{"id": "uuid-for-user", "password": "new-password"}' \
  "https://statscloud.your-domain.com/api/users.set_password"
Forgotten passwords
If users forget their passwords, you will be required to provide these to them manually. For reference, if a user clicks on the "Forgotten password" link, they will be presented with a dialog box explaining that they should contact the administrator of the statscloud instance to request this.
OAuth
In your default.yml file, you have an option to provide an entry for oauth. The entry for this will initially be empty ({}), but you can populate it with details of any OAuth services you have registered with and wish to use. An example of how to configure this is below:
oauth:
  github:
    type: github
    client_id: x123
    client_secret: x456
  google:
    type: google
    client_id: x123
    client_secret: x456
  myopenidprovider:
    type: openid
    client_id: x123
    client_secret: x456
    scope:
      - openid
      - profile
      - email
The credentials required for each OAuth service may differ, but generally they will provide you with a client_id and a client-secret. In addition, please remember to provide a name for the service under type.
When the statscloud app loads, it will search for any OAuth services that have been defined and place these at the bottom of the "Login" button on the login screen (at /login).
Note: At present, we have logos for "Microsoft", "GitHub" and "Google". Any other service will show a "User" icon. If you would like a logo to display for another OAuth service, get in touch with us and we'll see if we can add it for you.
Single Sign-On
If your institution has a Single Sign-On (SSO) service you can make use of, you can integrate this into statscloud to help ease the login process for your users. Ultimately, the login flow would look like this:
- A user visits
https://statscloud.your-domain.comand clicks "Login (via Single Sign-On)" - They are redirected to your login page (e.g.,
https://your-domain.com/sso-login?redirect=https://statscloud.your-domain.com) - Your SSO system authenticates the user and obtains their email address
- Your backend makes a secure HTTP request to:
https://statscloud.your-domain.com/api/user.login_as - The API provides a session ID in the response
- Your SSO page then redirects the user back to statscloud with this session ID (e.g.,
statscloud.your-domain.com?session_id=abc123) - The statscloud app will read this session ID and log in the user automatically
Let's look at this in more detail:
Setting up the SSO URL:
Firstly, to ensure that the "Login (via Single Sign-On)" button displays in the app, you'll need to define the destination of this URL in the admin settings inside the statscloud user-interface. You can find these settings in the 'setup' portal of the app (i.e. "https://statscloud.your-domain.com/setup") or by logging in as an admin user to your instance and navigating to the 'settings' page at "https://statscloud.your-domain.com/home/settings".
The settings page will look like this:
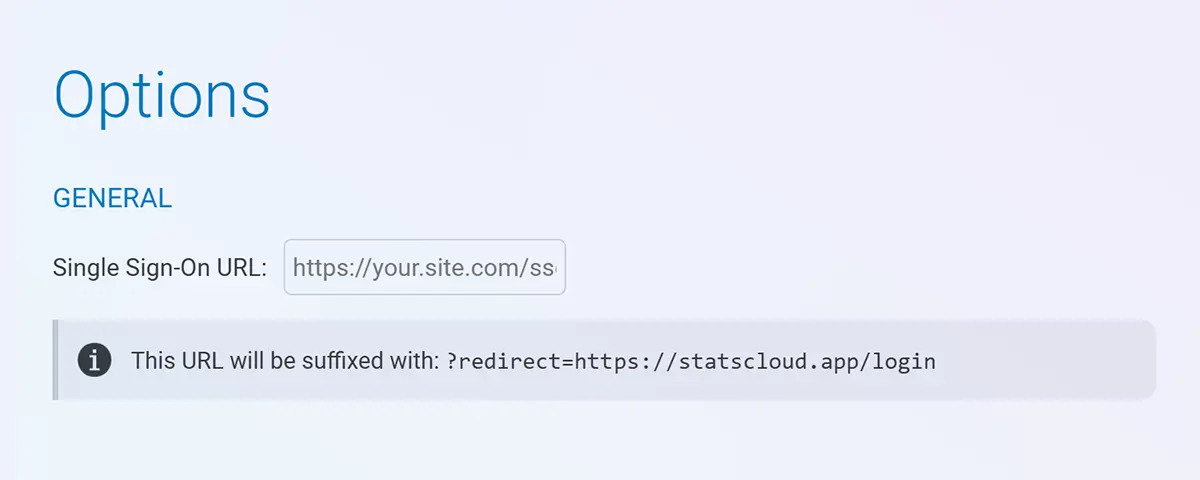
Simply replace the placeholder text with the URL of your Single Sign-On service and then click "Save changes" at the bottom of the page.
Note: The
?redirectparameter is automatically appended to the URL so you only need to define the path of the SSO website in the URL. The website appended here will be the same as the origin of your statscloud instance (e.g.,https://statscloud.your-domain.com)
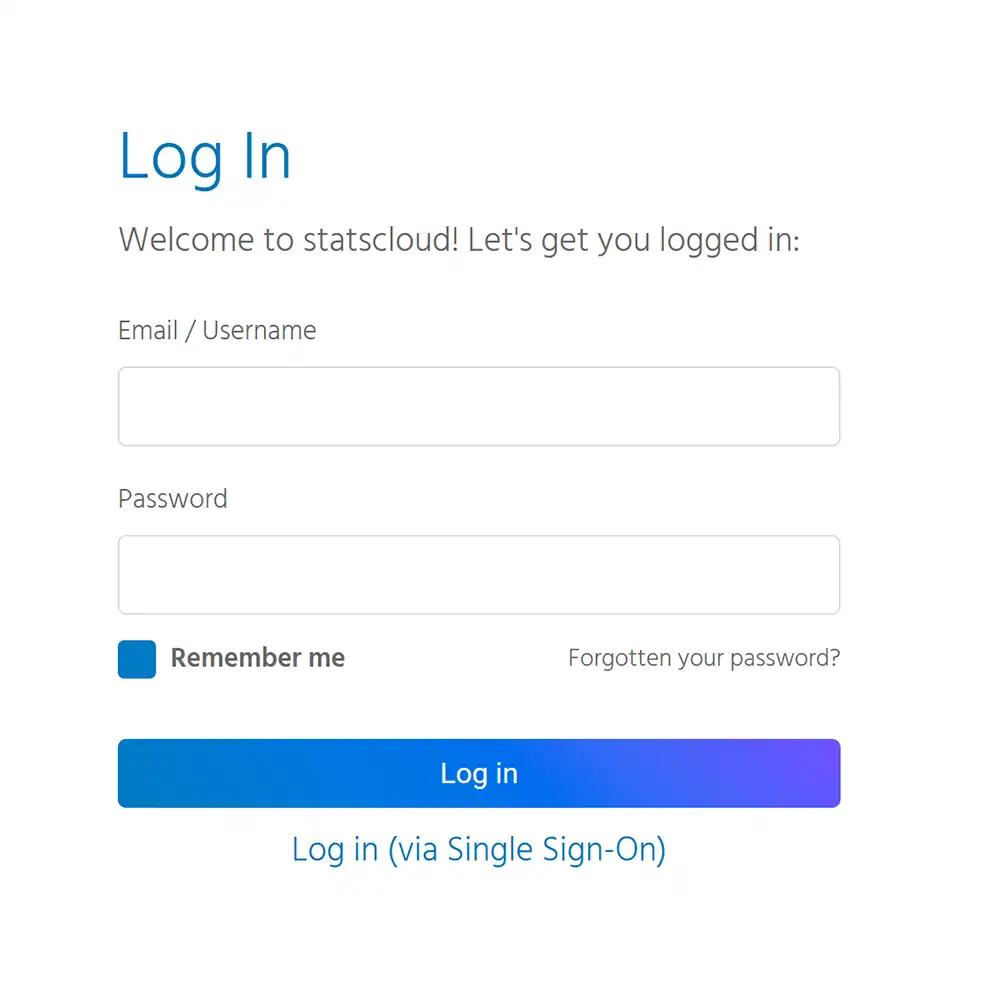
Once this has been defined, you should now see a "Login in (via Single Sign-On)" at the bottom of the /login page:
Configuring your SSO code:
To implement the login flow with statscloud on your SSO site, you’ll need to:
- Host an SSO login page at a public URL (e.g. https://your-domain.com/sso-login)
- Accept a redirect query parameter so the user can be sent back to statscloud
- Authenticate the user via your SSO system
- Retrieve the authenticated user’s email address
- Perform a backend-to-backend POST request (see below) to get a session token
- Redirect the user back to the provided redirect URL with the token as a query parameter
To get a session token, you'll need to make use of the /api/users.login_as API endpoint:
API Endpoint
POST https://statscloud.your-domain.com/api/user.login_as
Request
{
    "email": "user@email.com"
}
Response
{
    "session_id": "abc123"
}
You can test this out on your instance with the cURL request below (substituted with your details):
curl -X POST \
  -H "Authorization: Bearer <your admin token>" \
  -H "Content-Type: application/json" \
  -d '{"email": "user@email.com"}' \
  "https://statscloud.your-domain.com/api/users.login_as"
Below is an example (language-agnostic) that demonstrates what your SSO backend code may look like:
// Your SSO backend code:

redirectUrl = getQueryParam("redirect")
email = getAuthenticatedEmail()

sessionID = httpPost(
  "https://statscloud.your-domain.com/api/user.login_as",
  headers = { "Authorization": "Bearer <your-admin-token>" },
  body = { "email": email }
)

redirectTo(redirectUrl + "?session-id=" + sessionID)
Testing
- Navigate to https://statscloud.your-domain.com/login
- Click "Login in (via Single Sign-On)"
- You should be redirected to your login page
- Authenticate, and observe the redirect back to statscloud
- You should land in the app, logged in
Contact
Of course, if you encounter any issues implementing this, please get in touch with us at contact@statscloud.app and we will endeavour to assist you.