Introduction
If you're running a self-hosted instance of statscloud and have successfully deployed this on your own server, you're now ready to set up your instance for your users. This guide is designed to help you through this process.
Accessing the setup interface
When your instance is up and running, you can access the setup portal by visiting http://localhost:8080/setup. This is a user-interface that allows you to set up the users and options for your instance of statscloud.

This screen will ask you for your "Admin token" in order to proceed. This can be found under the admin_token entry in the config/default.yml file included as part of the files hosted on your server. Please see the deploying statscloud article for more information on this).
Users
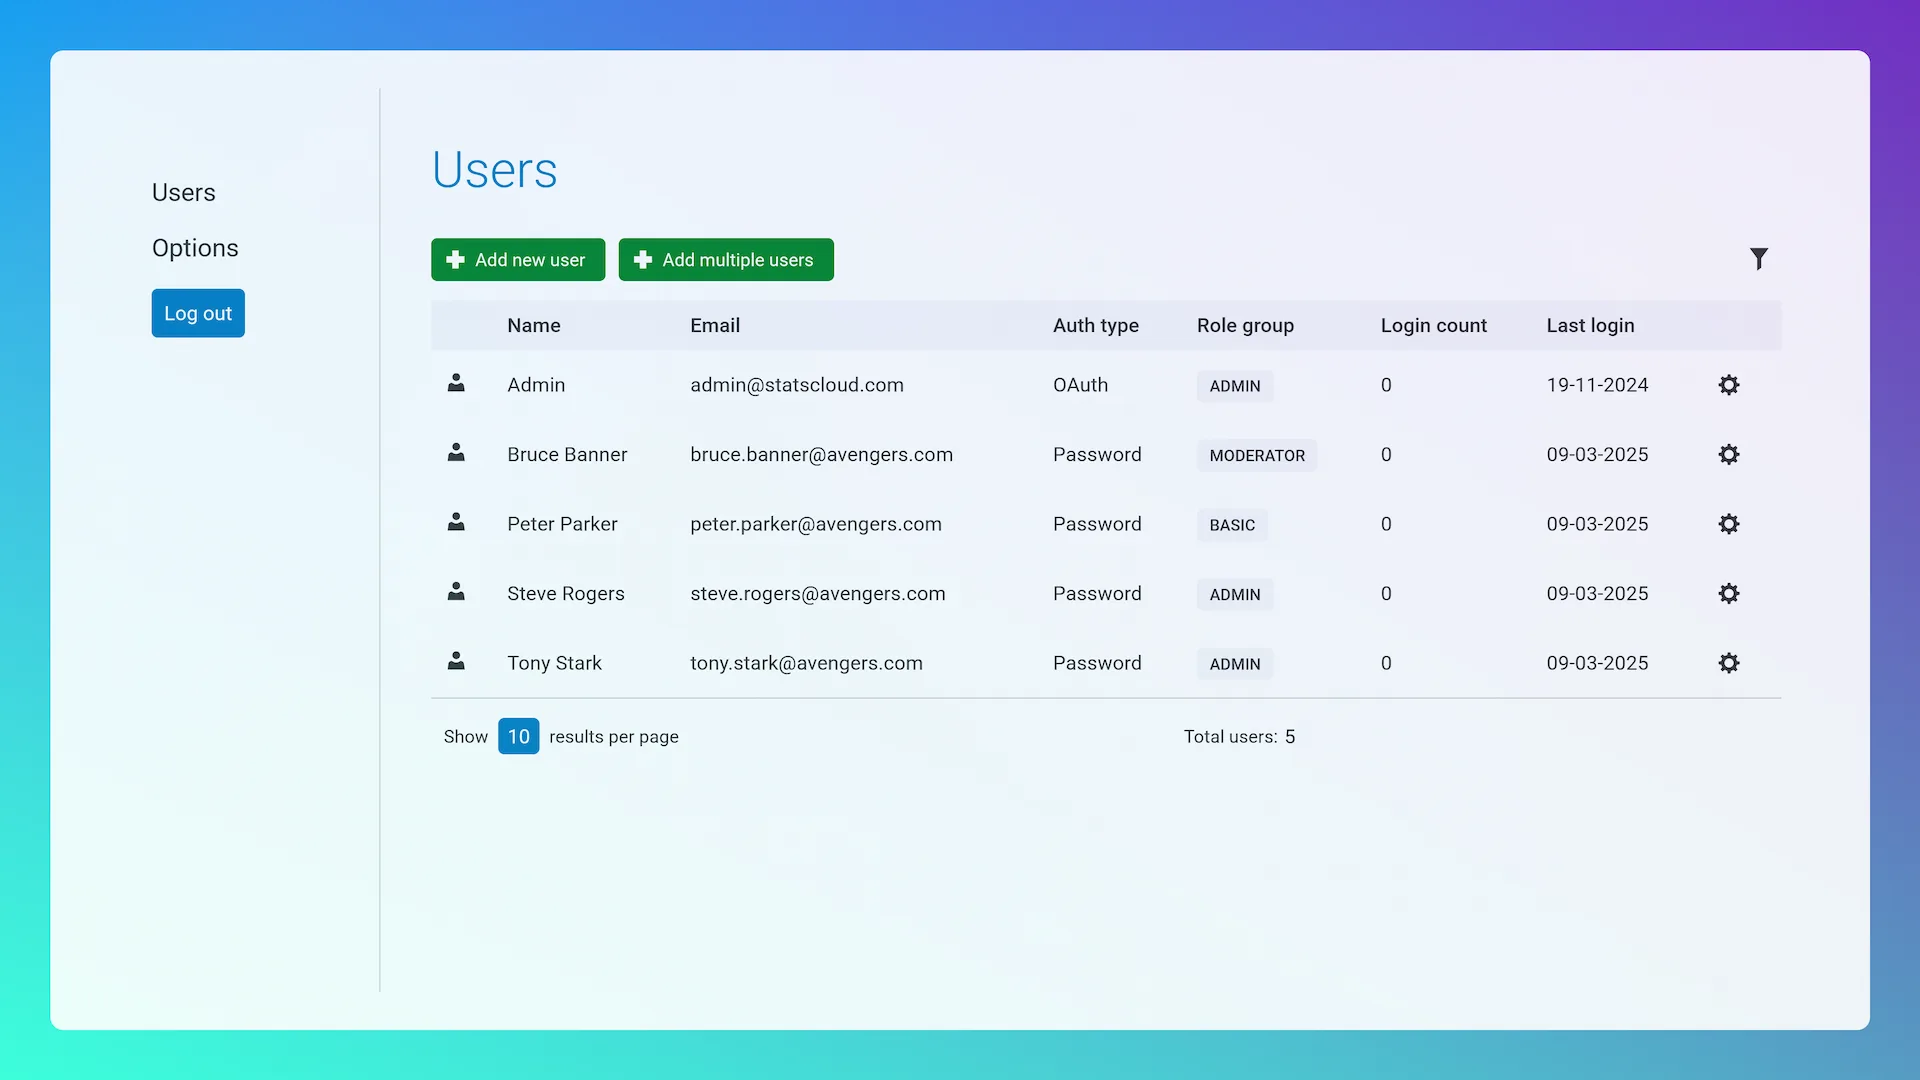
The first tab allows you to set up your users. This shows a table of all of the users listed on your instance, and includes details of their names, email addresses, how they are authorised, as well as information about their login behaviour.
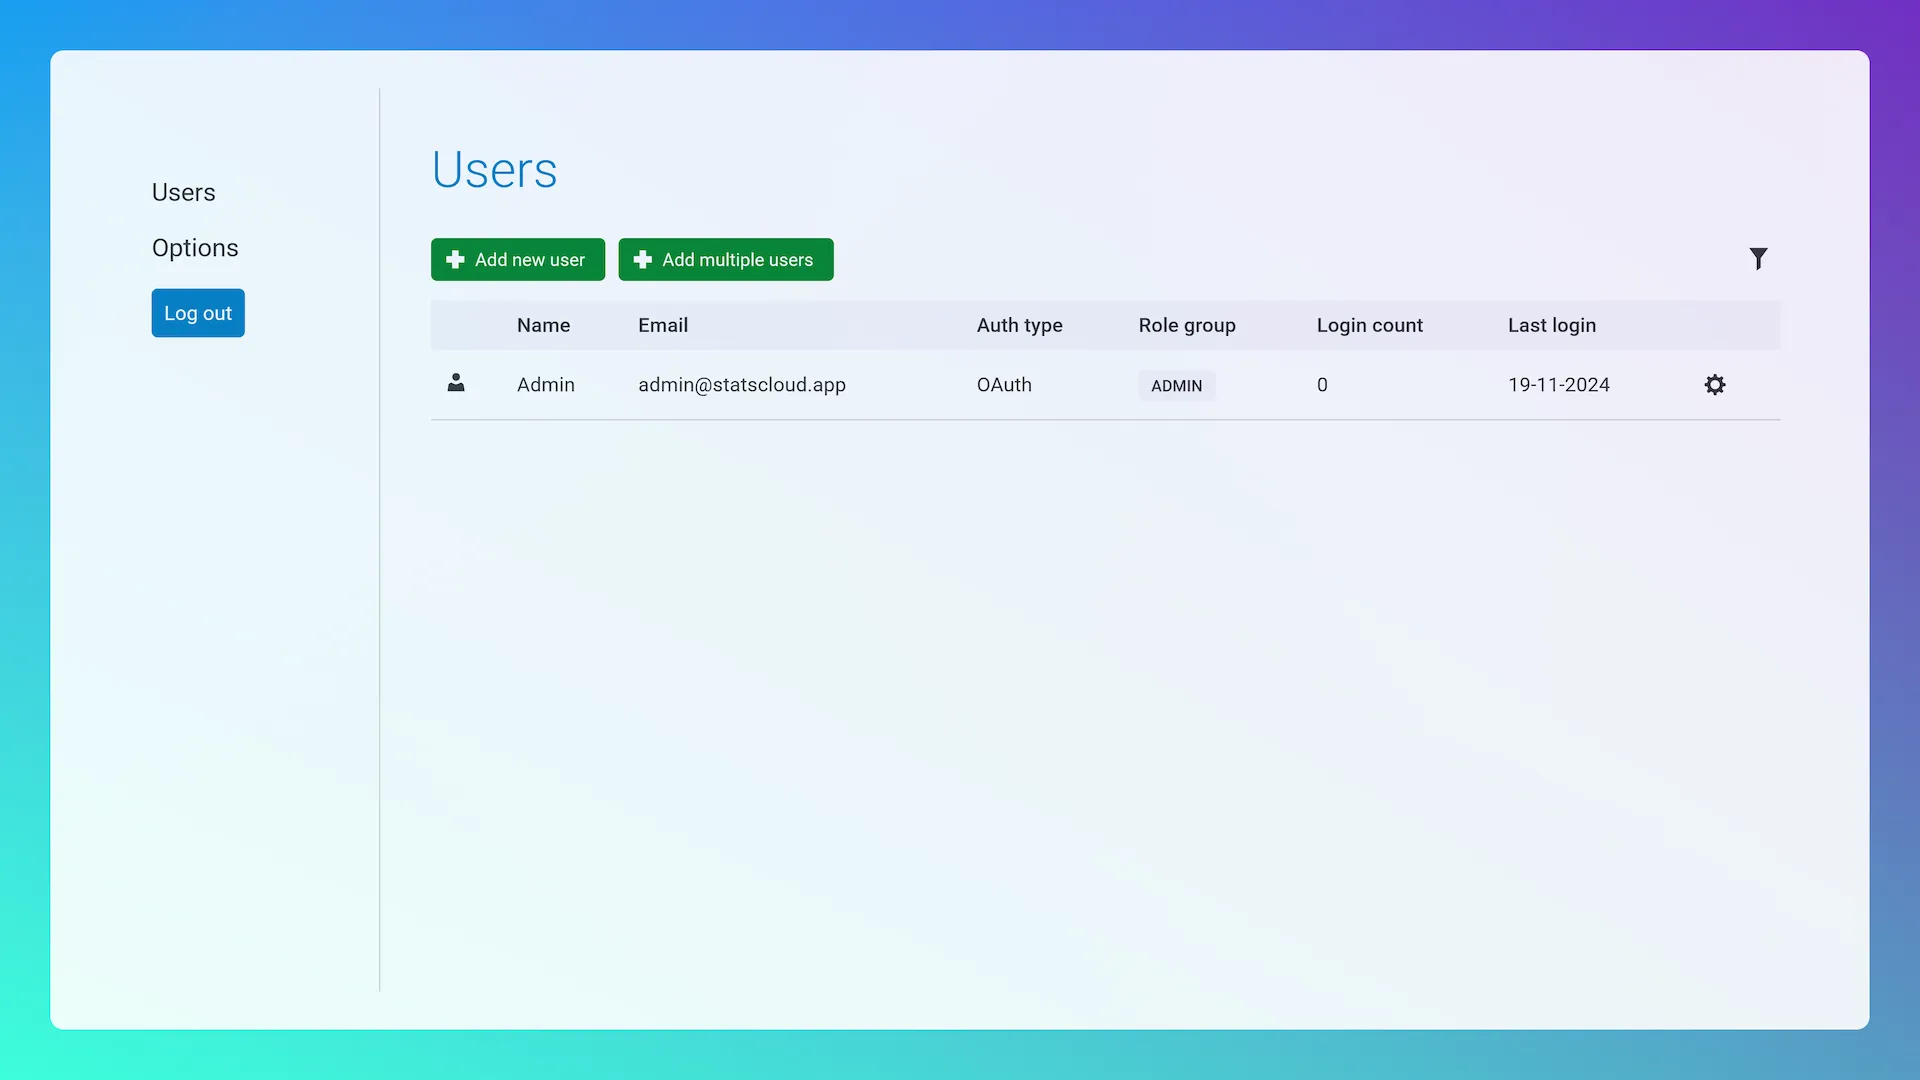
When you first access this, you'll see that the main adminstrator account (the one you are currently signed in to) is listed as the only entry. This superuser account is permanent and cannot be edited. From here, you can create new users, either individually or as a batch.
Setting up a single user
You can set up single users by clicking the button. When you do, you'll be greeted with a pop-up dialog box that asks you to complete some details about this user.
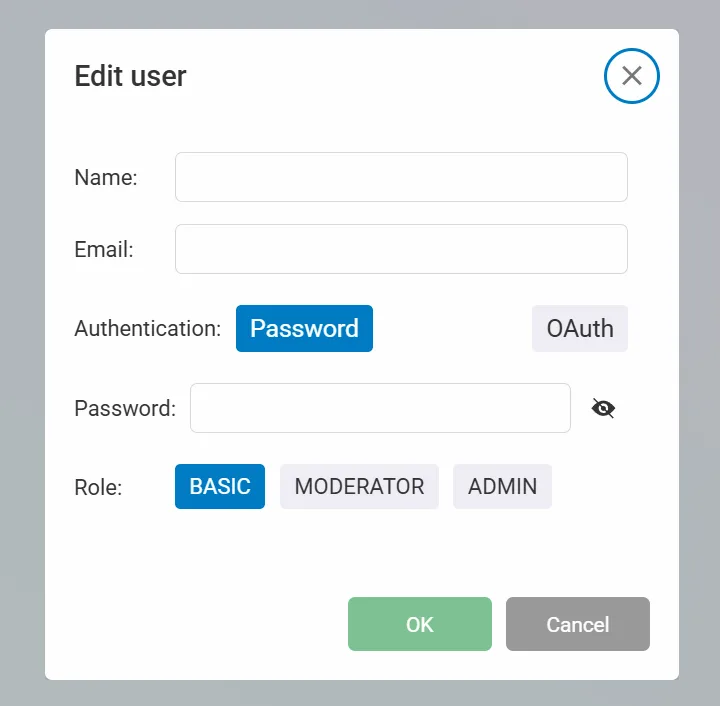
More information on what should be included in each of these entries is shown in the table below:
User attributes
| Attribute | Value |
|---|---|
| Name | The display name for the user |
| The user's email address | |
| Authentication | If you would like this user to sign in a password, select Password. Otherwise, if you have a set up OAuth, you can select OAuth. |
| Password | If you have selected Password as the Authentication method above, you should enter the user's password here (otherwise, this can be left blank) |
| Role | The role attributed to the user (see below) |
Each user in statscloud is assigned a role which determines what piviledges they have. For a summary of these, please see the table below:
User roles
| Function | BASIC | MODERATOR | ADMIN |
|---|---|---|---|
| Cloud-save projects | ✔️ | ✔️ | ✔️ |
| Cloud-save 'variables' library | ✔️ | ✔️ | ✔️ |
| Cloud-save user preferences | ✔️ | ✔️ | ✔️ |
| Generate live share links | ✔️ | ✔️ | ✔️ |
| Impersonate other users | ✔️ | ✔️ | |
| Edit app settings | ✔️ | ||
| Add / edit / delete users | ✔️ |
Note: In a university setting, you may want to assign BASIC roles to students, MODERATOR roles to teaching staff, and ADMIN roles to senior teaching staff or technicians.
Setting up multiple users
For cases when you have lots of users you would like to set up all at once, you can click the button to do so.

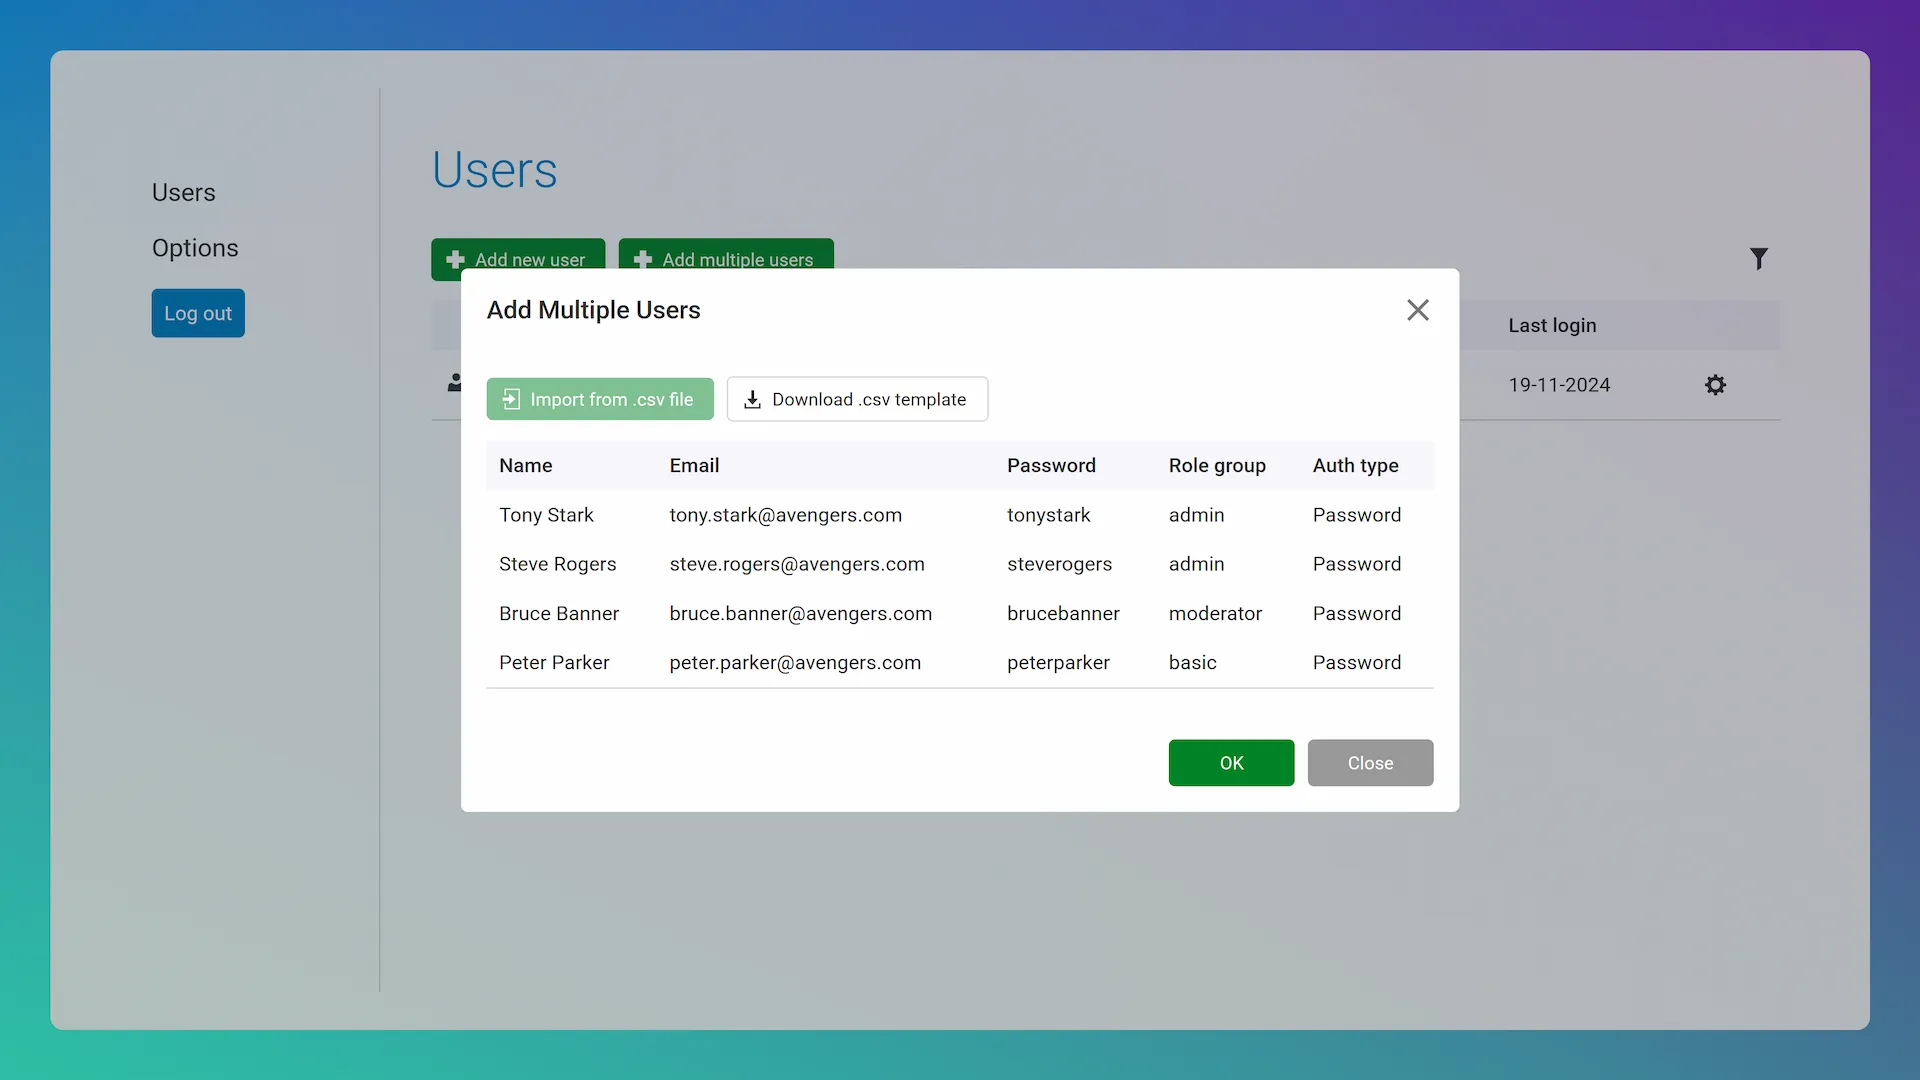
Click on this button will bring up a dialog box that gives you the option to import your users from a (.csv) file. You can click the "Download .csv template" button first to download a blank .csv file that contains the headings you'll need for this file to be read correctly.
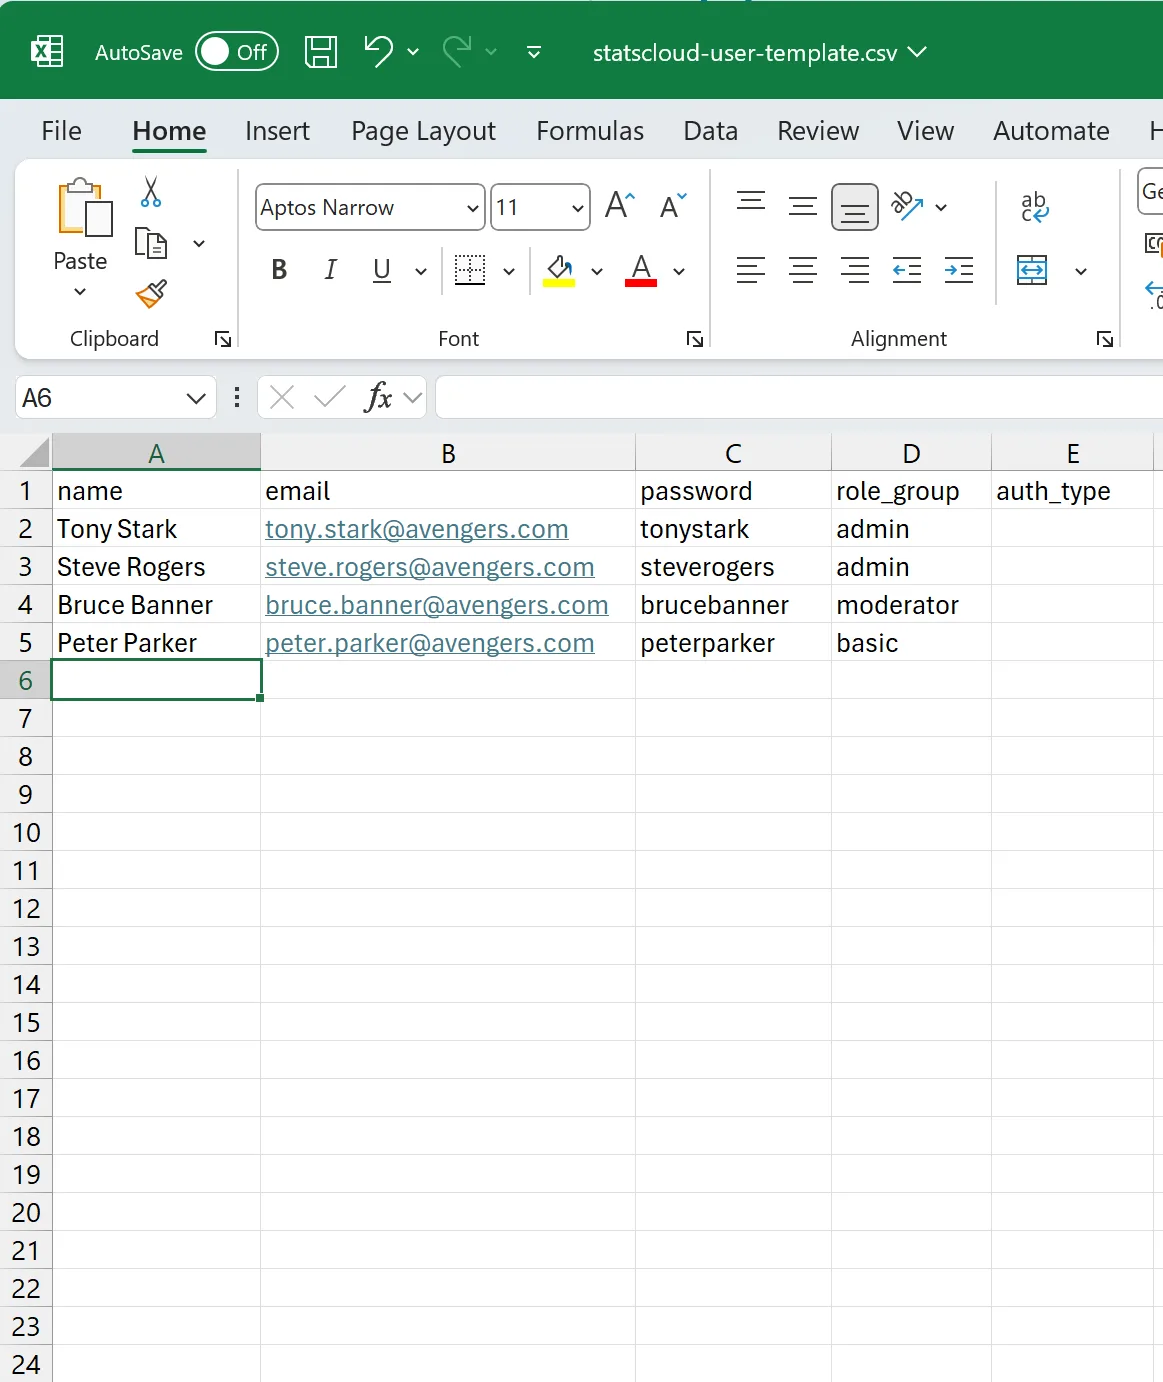
Here is an example of a .csv file set up with a few users added. As you can see, the entries are the same as the user attributes defined above. If you would like your users to sign in with a password, you can define this in the "password" column. In the "role_group" column, enter the name of the user role (in lowercase). The final column "auth_type" can either be "password" or "oauth". If you have defined a password in the "password" column, then this will automatically be selected as "password" so you can leave this column blank.
When you have completed and saved the file, you can import it using the button and see that pending users appear in the table below:
If you then click OK, you'll be taken back to the main "Users" screen with the new users added:
Note that, if you have set up passwords for your users, there is no way of viewing a password for a user once the user has been set up. However, if a user forgets their password, you can change this by editing the individual user yourself and contacting them to inform them of their new password.
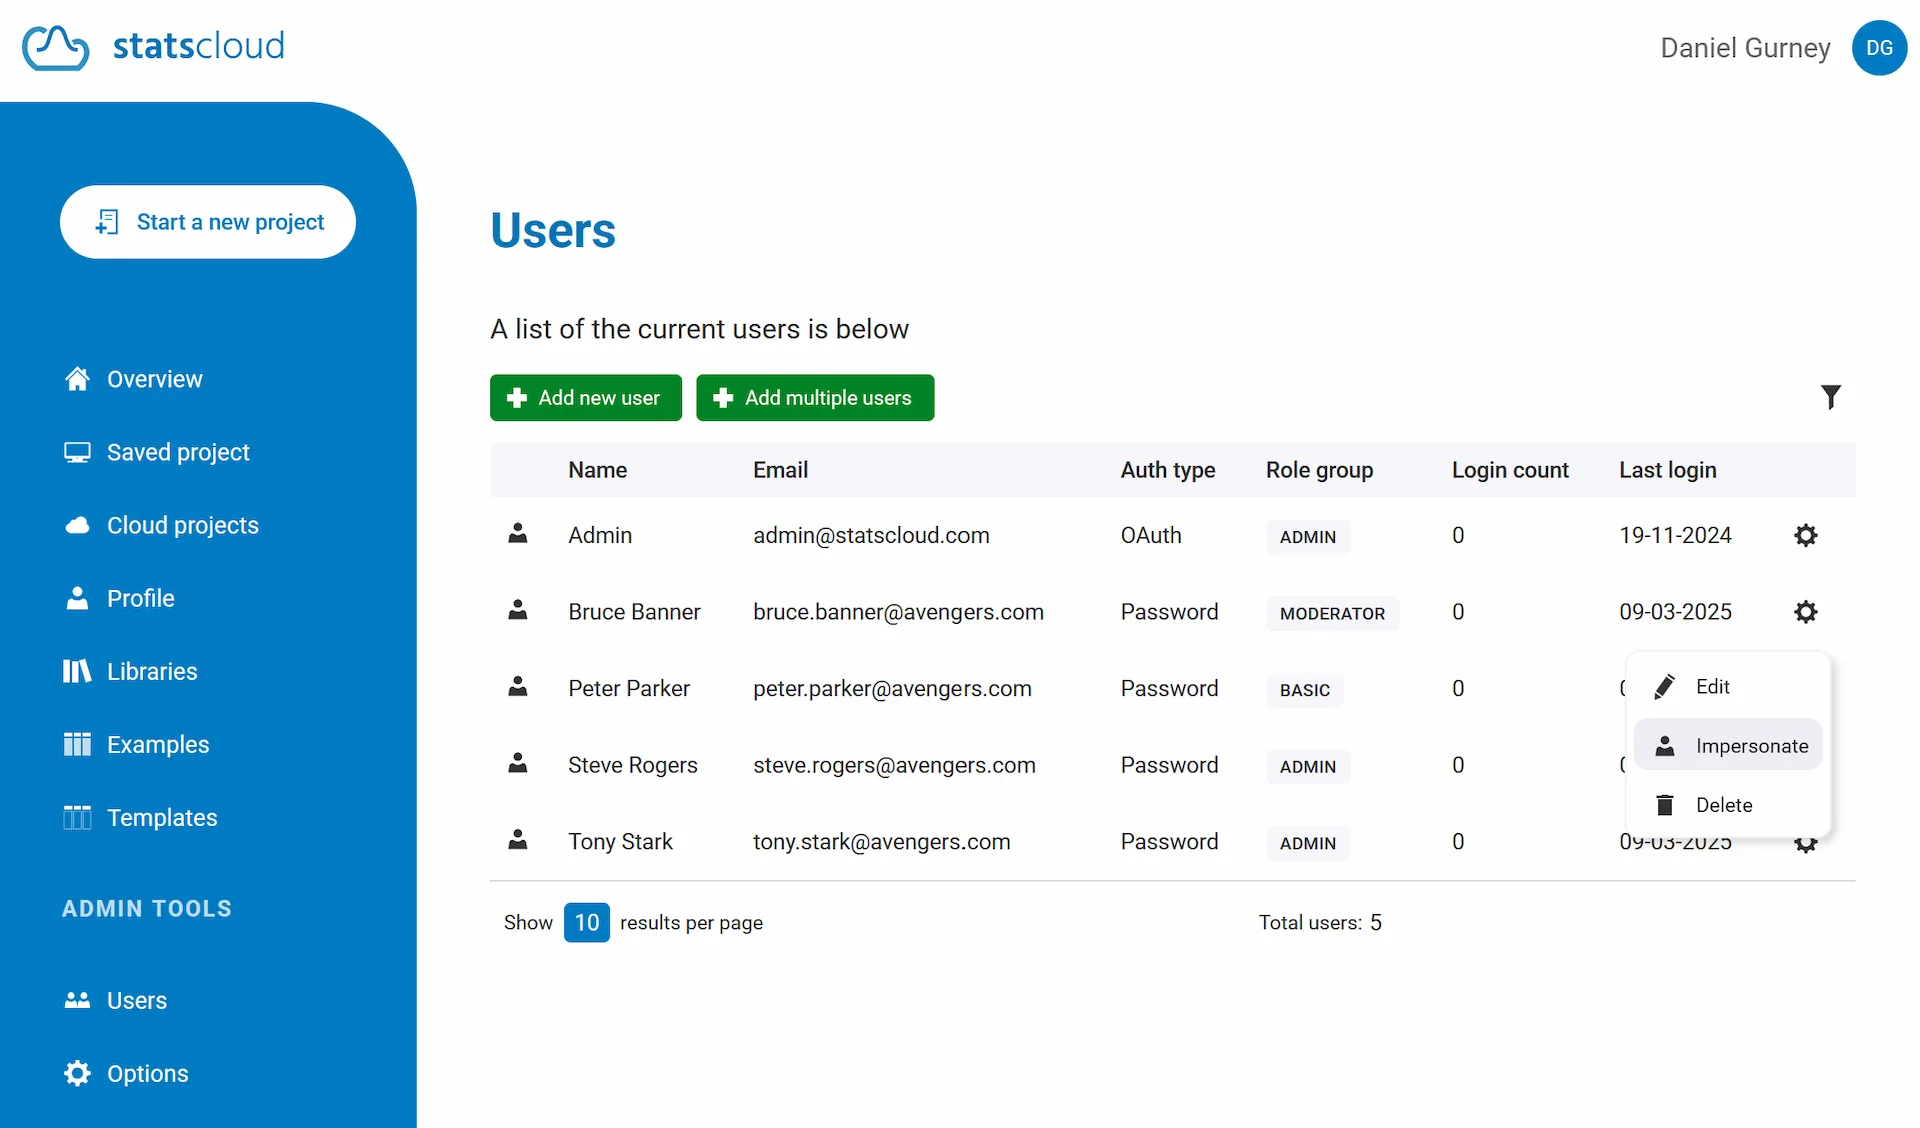
Editing and deleting users
You can edit or delete users by clicking on the settings (cog) icon at the far right of the row. This will bring up a menu that with options to both either edit and delete the user.
Warning: Please note that deleting a user will cause all of their data to be deleted, including all their projects and data associated with them, as well as their preferences and variables library. This action is not reversable, and the data can only be restored from your own backup of the
data.statscloudfile.
Options
The second tab allows you to configure options for your instance of statscloud. While users have the opportunity to set individual preferences for themselves (e.g., the language, dark mode), these settings affect all users and take effect immediately when they are committed.
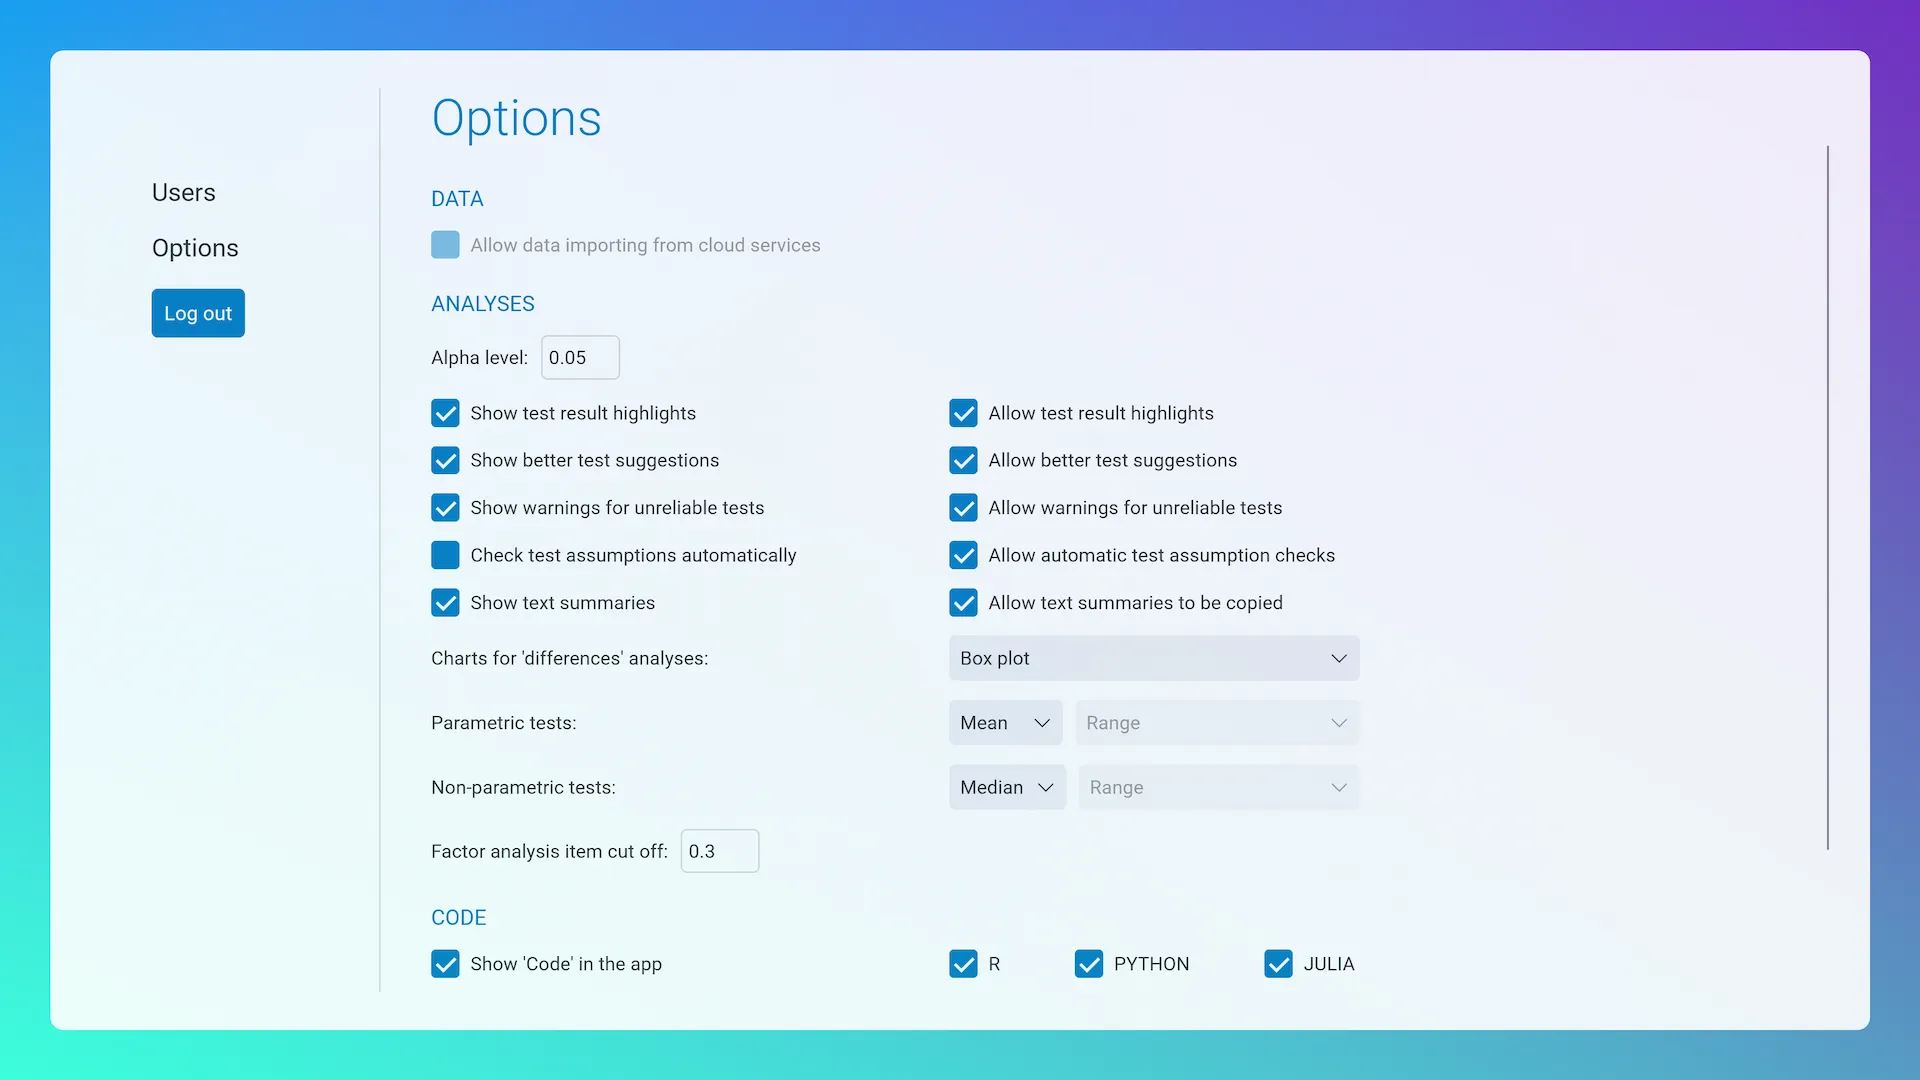
Data
Below are the options that can be edited for the data section of statscloud:
| Option | Default | Description |
|---|---|---|
| Allow data importing from cloud services | Off |
Whether the data toolbar should include a menu icon that allows users to import data files from third-party storage services (e.g., Google Drive, Dropbox, OneDrive). Note that this option is not currently available to customise |
| Max. file size (in bytes) | 50000000 | The maximum size of a data file that can be imported into statscloud |
| Max. row count | 10000 | The maximum number of rows a data set can have |
| Max. column count | 250 | The maximum number of columns a data set can have |
Note: You are free to increase the default values of these settings to values of your choice but note that this may well result in performance issues for your users
Filters
Below are the options that can be edited for the filters section of statscloud:
| Option | Default | Description |
|---|---|---|
| Max. number of filters | 100 | How many filters your users can have set up in a single project |
Charts
Below are the options that can be edited for the charts section of statscloud:
| Option | Default | Description |
|---|---|---|
| Max. number of charts | 100 | How many charts your users can have in a single project |
Analyses
Below are the options that can be edited for the analyses section of statscloud:
| Option | Default | Description |
|---|---|---|
| Alpha level | 0.05 | The default alpha level used when running frequentist analyses in statscloud |
| Show test result highlights | on |
Whether each analysis will display a summary box at the top of the screen highlighting what the key result of that analysis was. (Note that users can choose to turn this function on or off from their own preferences. Turning this off will still allow users to turn this option on for themselves if they choose to.) |
| Allow test result highlights | on |
Allows users to have this feature enabled in their interface even if "Show test result highlights" has been turned "off". |
| Show better test suggestions | on |
Whether each analysis will display a summary box at the top of the screen recommending a better test if one is available. (Note that users can choose to turn this function on or off from their own preferences. Turning this off will still allow users to turn this option on for themselves if they choose to.) |
| Allow better test suggestions | on |
Allows users to have this feature enabled in their interface even if "Show better test suggestions" has been turned "off". |
| Show warnings for unreliable tests | on |
Whether each analysis will display a summary box at the top of the screen warning users that this test is unreliable. (Note that users can choose to turn this function on or off from their own preferences. Turning this off will still allow users to turn this option on for themselves if they choose to.) |
| Allow warnings for unreliable tests | on |
Allows users to have this feature enabled in their interface even if "Show warnings for unreliable tests" has been turned "off". |
| Check assumption tests automatically | off |
If turned on, the interface will check the assumptions of analyses automatically (where possible) and provide users with a (red, amber, or green) flag |
| Allow automatic test assumption checks | on |
Allows users to turn automatic assumption testing on or off. If turned off, users will be forced to check all assumptions for tests manually |
| Show text summaries | on |
Whether the interface will include a "Text summary" section for each analysis that summarises the results of the analysis in words |
| Allow text sumamries to be copied | on |
Whether users will see a "copy" button appearing next to the text summaries, and whether the text in this section can be selected with a cursor |
| Charts for "differences" analyses | Box plot |
When users complete an analysis that compares the difference in scores between groups (e.g., an independent-samples t-test), what type of chart should be shown in the analysis summary to depict these differences. Other options include "Bar", "Horizontal Bar", "Line", "Box plot", "Raincloud plot", "Violin plot". |
| Parametric tests | Mean & Range |
What statistics should be used to generate the chart. Note that some of these options will not be available depending on the chart chosen |
| Non-parametric tests | Mean & Range |
What statistics should be used to generate the chart. Note that some of these options will not be available depending on the chart chosen |
| Factor analysis item cut-off | 0.3 |
When running a factor analysis, what value should be the cuttoff point for displaying loadings in the factor loadings table |
Code
Below are the options that can be edited for the charts section of statscloud:
| Option | Default | Description |
|---|---|---|
| Show "Code" in the app | On |
Whether the Code tab is available in the side menu of the interface, and whether the "Code" section appears in the analysis summary outputs |
| Code options | R, Python, Julia |
Which programming languages would you like to have featured in the "Code" sections of the app |
Saving options
To save your options, please ensure you click the button at the bottom of this page. These changes will come into effect for all of your users immediately when they next open the app or refresh the page.
Access for other ADMIN users
If you have set up any users with ADMIN roles, they will be able to access both the "Users" and "Options" tabs from their home dashboard under the "ADMIN TOOLS" heading in the sidebar:
The interface for the "User" and "Options" content is identical to the one in the setup portal accessed by the superuser, so provides exactly the same level of control.